Homemade Ghee Guide: Unlock Dairy-Friendly Flavor & High Heat Cooking
For centuries, ghee has been a cherished ingredient in South Asian and Middle Eastern cuisines, prized for its rich flavor and unique properties. More recently, it has gained significant popularity in Western kitchens, particularly among those seeking dairy-friendly alternatives or healthier cooking fats. If the thought of expensive store-bought jars has kept you from enjoying this golden elixir, you're in luck! Learning
how to make ghee at home is surprisingly simple, cost-effective, and incredibly rewarding.
Many discover ghee out of necessity, perhaps due to a loved one's dairy sensitivity, only to fall in love with its distinct taste and versatility. Imagine enjoying that beloved buttery flavor without the digestive discomfort or the fear of burning your delicate dishes. This comprehensive guide will walk you through everything you need to know, from understanding what ghee is to mastering the simple steps of creating your own batch of liquid gold.
Understanding Ghee: More Than Just Clarified Butter
At its core, ghee is a highly clarified form of butter, where the water content and most milk solids have been meticulously removed. While often used interchangeably, there's a subtle yet significant difference between clarified butter and ghee. Both involve melting butter and separating the milk solids, but ghee takes this process a step further.
When making traditional ghee, you continue to gently cook the butter *after* the initial separation, allowing the remaining milk solids at the bottom of the pan to lightly caramelize and turn a beautiful golden brown. This subtle browning imparts ghee with its signature deep, nutty, and often described as butterscotch or toffee-like flavor, setting it apart from standard clarified butter which is simply clear and mild.
Why Ghee Stands Out From Regular Butter
Ghee offers several compelling advantages that make it a staple for discerning cooks and those with specific dietary needs:
*
Dairy-Friendly Option: For individuals with mild sensitivities to dairy, ghee can be a wonderful alternative. The traditional clarification process effectively removes the majority of lactose (milk sugar) and casein and whey proteins, which are often the culprits behind dairy-related digestive issues. This makes it a popular choice for those following Paleo, Whole30, or other restrictive diets that avoid conventional dairy. To delve deeper into this benefit, read our article on
Ghee Benefits: Why This Clarified Butter is Perfect for Dairy Sensitivity.
*
Remarkably High Smoke Point: One of the most significant culinary benefits of ghee is its incredibly high smoke point. While butter typically smokes and burns at around 302-350°F (150-177°C) due to its milk solids, ghee can withstand temperatures of 450-485°F (232-252°C) or even higher. This makes it an ideal fat for high-heat cooking methods like sautéing, searing, roasting, and deep-frying, allowing you to achieve beautiful browning and flavor without burning the fat or producing acrid smoke. For a full comparison, check out
Ghee vs. Butter: High Smoke Point Cooking and Dairy Sensitivity Explained.
*
Rich, Complex Flavor: The process of browning the milk solids imbues ghee with a unique depth of flavor that enhances almost any dish. It provides a luxurious, buttery foundation that regular butter simply can't match, especially when used in savory applications.
*
Longer Shelf Life: Because the water content has been removed, ghee is much less susceptible to spoilage than regular butter. Properly made and stored ghee can last for months at room temperature, making it a convenient pantry staple.
How to Make Ghee: Your Step-by-Step Guide to Golden Goodness
Ready to experience the magic of homemade ghee? The process is less daunting than you might think. Follow these simple steps to create your own batch of this versatile, flavorful fat.
Gather Your Ingredients and Tools
Before you begin, ensure you have the following:
*
High-Quality Butter: This is the most crucial ingredient. Start with the best quality butter you can find, preferably unsalted, grass-fed, and organic. While salted butter *can* be used, unsalted is generally preferred as it gives you more control over the final salt content of your dishes and allows the pure ghee flavor to shine. Grass-fed butter tends to have a richer color and higher nutrient profile, contributing to a superior finished ghee.
*
Heavy-Bottomed Saucepan: A thick-bottomed pan ensures even heat distribution and prevents scorching.
*
Fine-Mesh Sieve: For straining out the solids.
*
Cheesecloth, Butter Muslin, or Coffee Filters: These provide an extra layer of filtration for truly pure ghee. You can layer a few pieces of cheesecloth or use a coffee filter within your fine-mesh sieve.
*
Heat-Resistant Jar(s) with Lid: For storing your finished ghee. Glass jars work perfectly.
*
Ladle or Spoon: For skimming the foam.
The Process: From Butter to Ghee
Making ghee is a slow and steady process that rewards patience. Resist the urge to rush it with high heat.
1.
Prepare the Butter and Begin Melting:
Cut your butter into smaller pieces to help it melt more evenly and quickly. Place the butter in your heavy-bottomed saucepan over
medium-low heat. The key here is gentle heat to allow the butter to slowly melt without browning prematurely.
2.
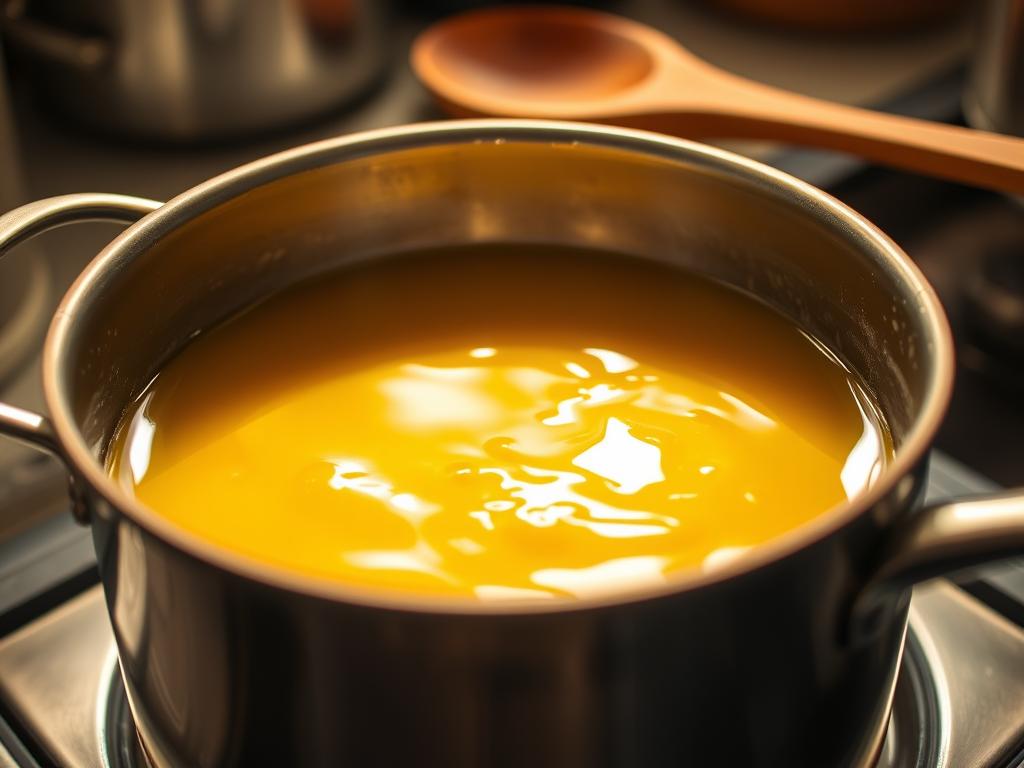
Watch for Separation and Foaming:
As the butter melts, it will transform into a bright yellow liquid. Soon after, it will begin to bubble, foam, and separate. You'll notice a layer of white foam forming on the surface. This is largely the whey proteins and some impurities from the butter beginning to rise. The butter will also make a soft sizzling or popping sound as the water content begins to evaporate.
3.
Skim the Whey (Optional, but Recommended for Purity):
Using a clean spoon or ladle, gently skim off the white foam that collects on the surface. While some people skip this step, removing this initial layer helps to ensure a purer ghee. You can discard the skimmed whey, compost it, or if you're not dairy-sensitive, it can be a flavorful addition to mashed potatoes or other recipes!
4.
Observe the Clarified Butter Stage:
Continue simmering the butter on medium-low heat. The bubbling will subside somewhat, and the liquid butter underneath the foam will become increasingly clear and golden. At this point, most of the milk solids will have sunk to the bottom of the pan, forming a layer. If you were to stop here and strain, you would have clarified butter.
5.
Achieve the Ghee Transformation: Browning the Solids:
To make true ghee, continue cooking. The key is to brown the milk solids that have settled at the bottom of the pan. Keep a close eye on them; they will transition from white to light golden, then to a rich, toasty brown. You'll notice the aroma in your kitchen changing from simply buttery to a wonderfully nutty, butterscotch-like fragrance. This is the moment when the magic happens! The ghee itself will turn a beautiful deep golden color, and the bubbling will become very quiet as almost all the water has evaporated. *Be careful not to burn the solids*, as this will impart a bitter taste to your ghee. The process from clear clarified butter to browned solids typically takes another 5-10 minutes, depending on the heat and quantity.
6.
Cool and Strain Your Ghee:
Once the milk solids at the bottom are golden brown and the ghee is aromatic and clear, remove the pan from the heat. Allow the ghee to cool for about 10-15 minutes. This cooling period prevents the hot ghee from potentially cracking your glass jars and makes it safer to handle.
Place your fine-mesh sieve over a clean, heat-resistant jar. Line the sieve with several layers of cheesecloth, butter muslin, or a coffee filter. Carefully pour the cooled ghee through the prepared sieve, ensuring that all the browned milk solids are caught by the filter. This step is crucial for removing any remaining protein particles, giving you pure, smooth ghee.
7.
Store Your Homemade Ghee:
Once strained, seal the jar tightly. Homemade ghee can be stored at room temperature in a cool, dark place for several months, thanks to the removal of water and milk solids. If you live in a very warm climate or prefer to extend its shelf life further, you can store it in the refrigerator, where it will solidify and last even longer.
Expert Tips for Perfect Homemade Ghee Every Time
*
Low and Slow is the Way to Go: Patience is truly a virtue when making ghee. Rushing the process with high heat can lead to burnt milk solids and a ruined batch. Stick to medium-low heat throughout.
*
Listen and Look: Pay attention to the sounds and visual cues. The vigorous bubbling indicates water evaporation. When the bubbling quiets down and the ghee becomes clear, you're close. The browning solids and nutty aroma are your final indicators.
*
Don't Waste the Solids (If Not Sensitive): If you don't have dairy sensitivities, those browned milk solids at the bottom are incredibly flavorful! They can be a delicious topping for toast, oatmeal, or even roasted vegetables.
*
Yield: A general rule of thumb is that 1 pound (4 sticks) of butter will yield approximately 1.5 to 1.75 cups of ghee.
Embrace the Versatility of Ghee in Your Cooking
Now that you've mastered
how to make ghee, the culinary possibilities are endless! Its high smoke point makes it excellent for:
*
Sautéing and Stir-Frying: Give vegetables, proteins, and grains a rich, buttery flavor without burning.
*
Roasting: Drizzle over root vegetables, chicken, or fish before roasting for incredible depth of flavor and beautiful caramelization.
*
Frying: Perfect for eggs, pancakes, or even shallow-frying.
*
Baking: Substitute for butter in certain recipes to add a nutty flavor and enhance texture.
*
Indian Cuisine: An essential fat for tempering spices, making curries, dals, and various sweets.
*
Flavor Enhancer: A dollop of ghee in popcorn, scrambled eggs, or even a cup of coffee (bulletproof coffee style!) adds a unique richness.
Learning how to make ghee at home is a skill that empowers you to take control of your cooking fats, embrace dairy-friendly options, and infuse your dishes with unparalleled flavor. It's a simple process with profound culinary rewards. So, grab some butter, set aside a little time, and prepare to unlock a new level of flavor in your kitchen!